Note: Charm’s, especially Raccoons, are not good for a first character if new to Trickster. Best to start with either a power type or magic type character as your first to help you adjust to how the game works. Consider Charm at a later time. This guide isn’t a focus for either PvE or PvP. Adjust and omit whatever fits for you and the purpose for your raccoon.
The path of a gambler isn’t easy and may require some thorough thinking of your own of how you want to build your raccoon. Something to keep in mind is there are two different scales to play a Pure HV Gambler:
- High Risk, High Reward: Pure HV with HV Comps.
- Playing it safe: Pure HV with HP Comps.
You can experiment between the two once you get 2nd job, and alternate when you get 3rd job and can farm Phantom Dungeon 1-3 & 1-4, or gloom farm Path to Relics or Wharf whenever you’re able to get your guardian.
Build Graph
Recommend 4114. By the time you get to Mermaid Palace quests the WT is gonna be an minor issue at first and gradually become a hinderance the further you progress. Alternatively to buy time to get accessories for WT is put 40 points into WT and apply the rest into HV, and then get a point back 40 to reallocate those WT points to HV when you’re able to acquire an accessory with WT, and a charm for speed, from MyShop.
The default 3124 is ideal to start for WT at the cost of basic attack damage for your first class and some card damage for your 2nd job. Close or by 3rd job save up galders to purchase a Build Graph Reset to 4114.
Any other builds may be less than ideal.
Skills
This is based on a few guides I was able to find in archives and own experience.
Teacher
- Dodge Master - Master (12 Points)
- Mana Reflector - Master (13 Points)
- Sturdy Shield - Master (13 Points)
- Skunk Pouch - Level 10 (12 Points)
- Physical Training - Master (13 Points)
DM and PT should be top priority to master first.
MR and SS are secondary to master.
SP can wait until near or after getting 3rd job–level 10 is needed as a prerequisite.
Optional
-
Power Blow: Normally I would suggest Power Blow, but because of how fast it is to level in this server you won’t need it at all–set equip bonuses from Desert, Poppuri and Relics will suffice for your offensive attacks. It uses only AP. If acquired, use Master Authority soon after getting 2nd job; do not master. Warm Up will be handy until 2nd job.
-
Galder Thrower: Money isn’t a huge issue in this server, but if you do need some damage to get through some tough fights this may be an alternative, just be mindful of how frequently you use it vs how much trash you vender to NPC shops. Eventually the expense will be irrelevant, but so will the damage. Level at your own rate, damage is fixed.
Card Master
- Card Strike - Master (13 Points)
- Super Hips (5 Points)
- Impelling Rage - Master (16 Points)
- Metamorphosis - Master (16 Points)
- Wild Nail - Master (15 Points)
- One pair - Master (15 Points)
- Lady Luck - Master (17 Points)
This is where building a Raccoon begins between AP, HP, and HV.
Card Strike uses AP and HV and has range. Master soon as you can.
Empty Cards: Keep a steady supply on hand. With no WT to them you can virtually have an endless supply. Shops sell them for nothing and will get them frequently from card packs sold by card girl when looking for 3rd job skills.
Super Hips is great to avoid critical hits while Dodge Master is active. Acquire immediately with Card Strike. Requires level 10 Dodge Master.
Impelling Rage uses Current HP. Can be acquired next as an AoE push-back. Higher the level, the further mobs are pushed back. Be mindful damage made is decreased if a mob is pushed into an obstacle. Higher your Max HP, the bigger the damage range.
Metamorphosis is a weird skill compared to Evolution for Entertainer. His basic attacks when transformed are weaker as his AP will decline by a percentage, but still attacks faster with his kicks. Meta-exclusive skills are few and only best for 1v1 combat, but with increase in HV and DP there’s less worry of being swarmed by non-magic attack mobs. Be sure to have buffs on before transforming. Level to 10 soon as possible, ideally save up points at TM 102. Master when you have the points to spare.
Best use for Metamorphosis prior to Wild Nail is if WT % is 90+ and need to get across a big or a long path taking map to get to safety to a NPC vender to sell any drops from mobs or complete any quests to decrease the WT %. The CD is same as the length of the transformation unless you revert back prematurely (out of MP, faint, or change maps)–LifeTO server change. Relogging resets the CD.
Metamorphosis has it’s fair share of criticism of it’s mechanical design and usage, but handy for a quick get away and breather at minimum.
Wild Nail uses HV and requires Meta-Lvl 10. Usage may vary, but very powerful for 1v1 combat. Gradually level up at your own rate.
One Pair uses AP and HV. It is a stronger version of Card Strike with the same attack range, but using two cards. CS and OP are good to alternate between cooldowns.
Lady Luck is a passive buff for One Pair’s damage output, and only requires One Pair to be learned. By the time you get Lady Luck at TM 160, you my have One Pair mastered. Master this soon as possible.
- Starting at level 5 One Pair may use a third card.
- At level 8 may use up to four.
- At level 9 between three to four cards.
- At level 10 between three to five cards.
- At master One Pair will use between four and six cards.
Optional
Bodyguard: If you’re going to party frequently with this character, this may be beneficial for your team. The only catch is you need to be in close range of your teammate for it to trigger.
Furious Galder Thrower: Consumes more galders, however the attack damage (including crits) varies up to a maximum that depends on the level. May be beneficial for physical resistant mobs. Requires to master Galder Thrower.
Flux Capacitor: Requires level 10 Physical Training. At time of posting this guide I have not touched this skill, but in theory may remove the need for MP pots and stock up more on HP pots. By master you give up 22% HP for 90% MP regained. Experiment at your own pace.
Gambler
- Power Charing - Master (16 Points)
- Heavy Hit - Master (16 Points)
- Full House - Master (16 Points)
There is no preferred order in what to learn as you need to find these cards in packs or player shops, and have the points to learn them.
Power Charging is a stronger version of Impelling Rage. Requires IR level 10.
Heavy Hit is a Metamorphosis skill that can kick back an enemy. Uses Current HP and AP.
Note: There’s a glitch that can cause a mob to spawn freshly on top of the defeated without the spawning animation and may immediately aggro on you. In some cases may spawn fair distance off screen (custom resolutions may vary) and directly come to you at its own speed, going through no-walk zones and walls, and may even attack out of range–with the increase in DP and HV while transformed this is a non-safety-issue. This glitch is useful for item drop hunting and monster quests, but doesn’t work for every mob and isn’t a guarantee to happen on each use. The glitch happens regardless if the mob was damaged prior to using Heavy Hit.
Unknown if this is exclusive to LTO or bad coding by Ntreev. It may not be patched.
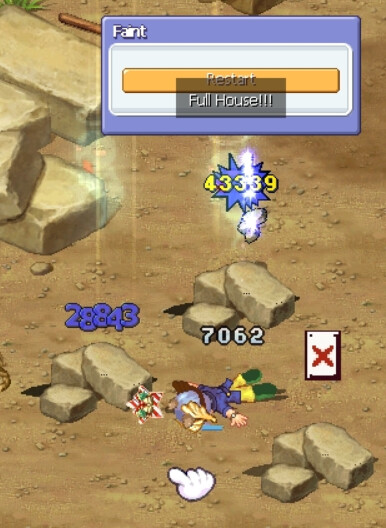
Full House is the Gambler move and a potential deadly AoE. It uses AP, HV and LK. It requires level 10 Skunk Pouch and One Pair. In LTO the cooldown is increased by 2.5seconds to prevent stun locking in PvP, however with IR and PC this isn’t too much of an issue to wait out in PvE. It’ll hit up to 5 mobs within a radius of your character.
There is one big catch to this: This move is not guaranteed to hit and instead may blowback to you with your own damage, taking your total DP into account. In theory you could faint by a Torobbie in Coral Beach or Rocks in Mirage Island by Full House failing. Be cautious in leveling and usage of this skill.
This is where the “High Risk, High Reward” and “Playing it Safe” fully apply for gambler. To maximize the damage you comp for HV but run the risk of getting KO’d more frequently or on a single failure and chug pots like an alcoholic. To prevent frequent fainting you comp for HP but the damage output will increase less sharply. Some equips may not allow HP or HV compounding, and vary in AP, LK, HP, HV. Having high HP is recommend to have before leveling up to master. Experiment with caution.
It’s theorized that LK may affect the chance of a success or failure of Full House, but that may be a superstition similar to LK affecting Mature Compounding. It will contribute to the damage however so be careful if choose to compound any LK in some equipment.
Optional
Summer Card Soldier: Best to learn this last as a third job skill. Getting the card is easy, but using the skill is very niche. While transformed, it summers a small card solider over the head of a targeted mob and baps them with potentially fixed damage that considers DP, and then vanish. I’ve barely used this skill, and isn’t ideal other than to pick off a mob if barely swarmed whilst tackling another one.
Equipment
This is based on experience with LifeTO and the options that are feasible.
Early in the equipment sets you get from the first three areas–Desert, Poppuri, Relics–will suffice until you get 2nd job. After 2nd job consider saving up galders, or donate, to get MyShop gear going forward.
Comp any for HP or HV at your own pace starting with the Relics gear or later. The MS stones are preferred near or after level 200, otherwise use mob dropped stones and other items that have compounding properties. Don’t worry about elemental attribute stones.
East Wind (Lv 70) and Venus (Lv 130) sets + respective pets are recommended prior to Titania set (Lv 170). You may come across better gear as you progress for your respective level. Refine up to level 4 at maximum starting with Relics gear or better, or refine higher starting with the Titania set.
Consider getting the following gear from the Egg Shop:
Innerwear
- Lv 110 Plate Armor Vest (At minimum to replace Duo Doctor)
- Lv 190 Maple Leaf Belt
- Lv 250 Flame Belt
Capes
- Lv 130 Wise Adventurer Cape (At minimum to replace Black Angel Wing Mantle)
- Lv 230 Reliable Adventurer Cape
Pets
- Splish Splash Yupika (Lv 150 to 240)
- Hardent and train only after you raise it to it’s max upgrade.
The Egg Shop is in Megalo Shop. You get Bonus Eggs from daily rewards on the site’s control panel between 1, 6, or 21. Some players will sell them in their shops.
Some in-game accessories will suffice, especially the class exclusive equips from the advancement quests. Eventually consider getting the timed accessories and charms from MyShop for more WT and speed. Only recharge (at minimum 39 coupons for 50 MS points each) and comp the level 230 charm (Shoestrings) and Level 250 accessories (Pouches), anything prior use as is for the week long duration.
Head and Face fashion equips from MyShop are also helpful, even the ones you get from progressing at level 90 and 130 are good to start with.
Starting with Sea Turtle 90, consider upgrading to…
- Hot Pot 130
- Tiny Moon Hat 150
- Time Bomb
- Ebon Butterfly
- Sea Turtle 210
- Hot Air Balloon
- ARGH
- Movie Camera 250
Starting with Emo Mask, consider upgrading to…
- Jelly Fish Goggle
- Glaring Eyes
- Lemur Mask
- Clever Disguise Nose 210
- Sleeping Kitty Mask
- Party Blowout 250
Misc. Advice
Despite the server has a strong sense of speed leveling, you can always go at your own pace with any character. Progress through the game normally to how you see fit, make any changes to your gear you’re comfortable of doing, and level up skills that are not of high priority at your own pace.
Money becomes less of an issue when you’re able to farm Phantom Dungeon hallway or 1-1, and later 1-3 and 1-4, however Pure Raccoon isn’t ideal in efficiency for farming PD but can be doable. PD 1-2 is a no-go zone for everyone full of exploding boys and shoo girls–you are warned.
Only worry about fashion/appeal soon as you feel accustomed to the character and money isn’t an issue to work with as it can be a money sink with fusions involved.
See Also: